Bears!

Once a week we drive my oldest boy for a class to the nearby town. To my delight (and surprise) I found two little stores with a small selection of fabrics (and wool!) and a large selection of notions! Hurray! I finally can buy thread and zippers and needles and… just around the corner (I prefer buying those things in the store over having to order every little thing over the Internet).

Most of the time I have my little boys in tow and while we wait for my oldest to finish his class, we spend our time in one of those little stores. There is always something I need and from time to time my boys are allowed to select something for themselves, too.  Usually they are allowed to select a button each (a box of an assortment of buttons is the best toy ever! really!) , but recently they where allowed to select fabric for pants.


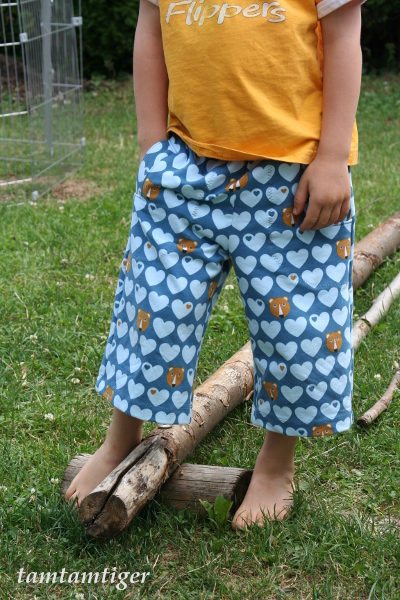
My middle child (he is 5 now) selected those hearty bears. It’s a cotton sweat by Swafing. The pattern is no. 10 from Ottobre 3/2013 in size 116. The pattern calls for poplin for a panel at the sides and a pocket on the back which I omitted. Instead I cut the back piece including the side panel. A cool feature are the welt pockets (my first!). The pocket bag has only one layer which is stitched to the front piece – this takes away some bulk and keeps the pocket nicely in place.


My youngest also selected a fabric for himself. His pants are still sitting on the cutting table. I am looking forward for my sewing group to resume, which will give me not only additional sewing time to finish this project but most importantly the joy of sewing socially!

Pattern: no. 10 from Ottobre 3/2013 in size 116. Alterations: I cut the back piece including the side panels, omitted the back pocket and adjusted the length.

Fabric: Swafing Sweat byGraziela Bären Herzen blau / hellblau

Will I do it again? Yes! The next one is already waiting!

This is my contribution to Made4Boys.

Dieser Blogpost ist auf Englisch. Ich lese und beantworte Kommentare aber gerne auch auf Deutsch.

The post Bears! first appeared on tamtamtiger.wordpress.com.

Frida

For my youngest I made Frida by Milchmonster. I actually made this already more than two years ago but never got around posting it and, unfortunately, the little one outgrew those nice pants in the meantime. But I had them lying around recently to show to a friend and the little one (he is now three) found them and put them on! They (almost) fit again without diapers! They are just a bit tight and a bit short…..

I made them according to the pattern in size 80 using a pair of old jeans from my husband. The only alteration I made was to use the largest size for the knee patches.

The back pieces I had to patch together because the original jeans had holes. I patched the back pieces and not the front pieces because I felt that might be more comfortable and I patched both sides (although it would not have been necessary) because of symmetry.

The little one was wearing those pants a lot and I am sad that they are now too small. In some blog posts I read that some are putting a rubber-band into the waistband. I didn’t do that. I felt that the pants are cut relatively snug around the hips which keeps them from falling off. But If you want to make them more roomy, a rubber band might be a good idea.

Pattern: Frida by Milchmonster, size 80. Alteration: I used the knee patches for the largest size.

Fabric: old jeans, leftover pieces of thick fabric for the knee patches, elastic jersey for the cuffs and waist-band from local fabric store.

Will I do it again? I have no plans now. But I start thinking that my oldest might like a pair!

This is my contribution to Made4Boys.

Dieser Blogpost ist auf Englisch. Ich lese und beantworte Kommentare aber gerne auch auf Deutsch.

The post Frida first appeared on tamtamtiger.wordpress.com.

Loop-Shawl

IMG_1844s

My older boys each got a loop-shawl. They are made from cotton jersey with 5% elastane. The sewing pattern is kind of free hand drafted with the help of the very nice woman at our local fabric store.

For the two-sided loop (orange stripes and green stripes)  I cut two pieces of 30 x 120 cm and for the one sided loop (light blue with little monsters) I cut one piece of 50 x 115 cm.

IMG_1841s

It took me quite some brain-gymnastics to figure out how to sew the loop together so that when turning it it comes out the right way. I finally figured that one had to first sew the long edges together which creates some sort of tube. The next step is to pull one short end through the tube meeting the other short end and sewing the two short ends together leaving a small (6-10cm) gap for turning.

IMG_1847s

My boys are now nicely bundled up in this still cold weather! What else is Made4Boys this month?

This post first appeared on tamtamtiger.wordpress.com.

baby boshi


babyboshi


I wanted to make a boshi for some time now. Boshi (Japanese: hat) is a recent trend in Germany and stands for handmade (mainly crocheted) hats. The trend was started by two students and now you can see even big rough guys sitting quietly with a crochet hook.

Our newest family member was in acute need of a hat, so I had an excuse to try my hands on making a boshi. During our postpartum days, when I couldn’t do much more than lying in bed and cuddling with the new baby, this was a very welcome occupation.

babyboshi2


Here is my version of a baby boshi (head circumference ca. 34 cm):

Yarn: Debbie Bliss 50% cotton, 50% merino wool; crochet hook: 4mm

Start with 5 chain stitches, close them to a loop with a slip stitch. Into this loop make 8 half double stitches. In the next round double each stitch (16 half double stitches), and in the next round double them again (32 half double stitches). Then double every fifth stitch until you reach the desired circumference minus one cm (56 stitches). Continue with double half stitches until the you reach the desired hight of the hat. Finish with one round of double stitches.

For the band I used a contrast color and, using chain stitches, made one long chain, which I wove into the double stitches of the back half of the hat. I made a second short chain with small loops on either side which I wove through the double stitches of the front half of the hat. The long ends of the long chain I thread through the loops of the short chain. This allows to adjust the width of the hat a little bit when binding the hat.

This is my contribution to Creadienstag and Made4Boys.

This post appeared first on tamtamtiger.wordpress.com.

Apron and name tags

IMG_9771a

The summer is over and we are adjusting back to normality. My older son turned six last week and will start preschool tomorrow. I am still worried whether I made the right decision to put him into preschool instead of first grade, but I guess only time will tell If it was right or wrong.

For preschool my son needed an apron, because they will paint and bake and cook a lot there. So I bought some water repellent cotton (the fabric is usually meant to be used as table cloths) and lots of bias binding. I decided to bind the apron in the neck because I feel that the loop around the neck is always too long,  but it still needs to go over the head easily.

IMG_9781a

Also, because everything for preschool needs to be labeled, I carved a name stamp from an eraser and used textile paint to print some name tags on some scrap pieces of cotton fabric. The inspiration for carving stamps I got from Geninne’s wonderful Art Blog, and the idea to stamp name tags for school items I was inspired by Masha-macht-mit.

Pattern: I took the pattern from a child’s apron we have at home.  I just extended the top and bottom a bit to make it longer.

Fabric: Water repellent fabric from a local fabric store and bias binding.

Stamp carving: I used an eraser from Staedtler, a kitchen knife and fabric paint.

This is my contribution to Creadienstag and Made4BOYS!

Synaptic Boogie

IMG_9658a

What is a Synaptic Boogie you may ask, and what or who is dancing it? Well, let me tell you, those are neurons on the t-shirt dancing this boogie. Eh? I guess this is what happens when a bunch of neuroscientists sit together for several weeks – their mind just goes all boogie…..

IMG_9707a

Anyhow, this is t-shirt no. 2 from my husband’s beloved t-shirt collection. Since t-shirt no. 1 was refashioned for our little one, t-shirt no. 2 was destined to be transformed for my older boy. I cut for him a t-shirt and to make it a bit more interesting, I used contrasting colored thread and blue cuff fabric for neckline and sleeves. This was only the second pieces I made following a design by Ottobre and I was utterly confused about where to add seam allowance and where not. As a a result I did not add seam allowance to the neckline and now it is a bit too wide. I should have at least added a wider cuff…. But my boy loves to be able to wear papa’s t-shirt, although it is still a bit too wide. I hope this thing will last long enough for my boy to properly grow into it. And he wears his t-shirt with short I showed here!

Pattern: Ottobre 3/2013 No. 11 “Birthday Fish” t-shirt, without applications.

Fabric: old t-shirt, cuff fabric from local fabric store.

Will I sew it again? Yes, I like the pattern. And hopefully next time I will be better about the neckline….

This blogpost  is my contribution to Made4BOYS! and my kid wears!

Play Suit

IMG_9623a

I was sorting through my husband’s t-shirts yesterday. Yes, I wanted to get some order into his things, that too, but I admit that the real reason was that I wanted to find some old t-shirts for a project I had in mind.  The old t-shirts I found were some much loved graphical shirts from long ago summer schools he had been to, but they were not suitable for my project. So, I reconsidered and converted one of the t-shirts into a play suit for our younger son (which made it much easier for my husband to say good-bye to them…).

Luckily I still had enough cuff fabric and matching thread in a nice contrasting red. The pattern was quickly found and traced and the pieces cut, maneuvering around the existing holes. Since I don’t have an overlocker I closed all seams using my normal sewing machine and a simple zig-zag stitching. I first closed the seam using a very narrow zig-zag and then secured the seam allowance with a large zig-zag top stitching. I had a bit of trouble with those buttons – it was the first time I was using them and it took me quite a few trials until they where acceptable.

playsuit

Overall I am quite happy with the outcome. The fit is not as perfect as I would have liked (too large arm holes, too long legs), but other than that I like how the two colors came together and the pictures became part to the design.

Pattern: Ottobre 3/2013 Nr. 2 with modifications: no pockets.

Fabric: Old t-shirt, cuff fabric from my stash.

Will I sew it again? Yes, but with some fitting modifications: smaller arm wholes, shorter legs.

This blogpost  is my contribution to Made4BOYS!

Update: because he is wearing this suit for the first time today (Monday, August 5), I will also show it at my kid wears!

Short Juist

juist_short

I finally managed to finish a sewing project again (apart from doing lots of mending). My older boy is in desparate need of shorts and I finally managed to finish a pair for him (it took me quite a bit of persuasion to have him pose for me – the shorts are better fitting in real life…). I used again the pattern Juist, but this time I made this pants in short form (the first and long version is here). The fabric is a lovely thick cotton from hilco. I realized only while sewing that the fabric has a stretch horizontally, and I would have preferred it without stretch, but the fabric feels great.

juist_short_2

This time I made the elastic in the waist adjustable. In the original pattern the waistband is one long piece that gets longitudinally folded and attached, and the elastic is inserted before the waistband is fully closed. Here I cut the waistband along the longitudinal fold, which yields an inside and outside piece. The inside piece I divided further into three pieces, cutting it where the elastic should enter the waistband. Then I added seam allowance to all edges and sewed the waistband back together, leaving openings for the elastic. Because my son always complaints that the folded over elastic and buttons hurt him, I covered the parts where the elastic enters the waistband with an extra piece of fabric, which can be opened and closed via snap fasteners. I don’t think that this is the best solution, though. Has anyone experience with adjustable elastic and how to hide it?

Fabric: Cotton with horizontal stretch from hilco.

Pattern: Juist Cargohose from Schnittreif bought at farbenmix, size 110-116. I made the following alterations: I made it as shorts, only using the upper leg parts. The waistband is composed of four pieces to allow for the elastic to be adjustable (see description above).

This blogpost is my contribution to Made4BOYS!